
Like every big question in life (let alone the more important ones about soil!), everyone wants the same answer….. THE RIGHT ANSWER.
But everyone who has been involved with Permaculture (or asked the Guru a question) will know that we’ll all get the same answer…. IT DEPENDS.
 My silence over the last few weeks was due to my attendance at approximately my 6th Permaculture Design Course as a logistics coordinator and sustenance deliverer; my 2nd as part time presenter and general sounding board / mentor; and my 1st since sitting through the whole thing as a student.
I am now well and truly qualified to say “They’re right”. It definitely does depend and in this BLOG SERIES I’ll try to explain what is talked about at Terra Perma’s PDC and why, so hopefully, my posts will give you enough information to determine what a course like this can or can’t offer to meet your current needs.
As I have been asked to document/formalise the Lesson Plans for this last Course (May 2015), we’ll take the opportunity to have a sneak peak at what is covered each day. And who knows, there might be a few incriminating snaps along the way.
But my challenge is to make it fast and short so we can get back to our Permaculture Design site visit (links below) and the New Guinea Bean investigation (promised at the end of our Klip Dagga exposé).
This also fits in well with our other series of conducting a design – The Permaculture 102 Series – where we are ready to go to our design site. A good recap and brief look forward won’t do us any harm at this point.
(See (1) Permaculture 102 – Permaculture Design: For Rural Only? Not in the slightest! – Part 1; (2) Permaculture 102 – Permaculture Design Part 2: Assessing an Urban Garden’s Potential Based on Sun Angles, and other Sources of Natural Energy; (3) Permaculture 102 – Permaculture Design Part 3: The Client Interview Sheet – Part 1.; (4) Permaculture 102 – Permaculture Design Part 3: The Client Interview Sheet – Part 2.)
So start at the very beginning ….. Terra Perma’s PDC Day 1
 Much of Day 1 we have covered in past blogs, so please forgive the references. Hopefully this enables you to delve to the depth you’re happy with rather than to clutter up this post with too much repetition.
Session 1 – Introductions
General Welcome – Discuss background of participants, specific interests and hopes for the course.
Icebreaker – best keep this a secret as it’ll lose its effectiveness and depending on the vivaciousness of the group this might be done at the start or end of the day.
Logistics – from loo locations to car pooling; parking to filming/photography; book borrowing to the 300+ page Design Manual provided. Essentially how are we going to work through the mountain of information as a cohesive group to emerge empowered, bonded and unscathed?
Scene setting – What are we here for? Presenters get to discuss their passion and objectives for the course….. and an hour passes rapidly by! Its hard to put a time limit on that enthusiasm. This discussion also give the high level introduction to the concept of Permaculture – a term blending the words PERMANENT with AGRICULTURE, and is described by its founder as “the conscious design and maintenance of agriculturally productive ecosystems which have the diversity, stability and resilience of natural ecosystems. It is the harmonious integration of landscape and people providing their food, energy, shelter and other material and non-material needs in a sustainable way.” (Permaculture, A Practical Guide to a Sustainable Future; Mollison, B.; 1990)
Other – Emphasis is on group learning, ongoing questioning, and contributions of experiences. However where people feel uncomfortable or shy (especially in the early days or the course), private discussions of issues, special considerations, or additional help are very much encouraged to ensure every member gets the most out of the course.
Session 2 – Design Process in Fast Forward
This is a glimpse of the future. The design process is run through from start to finish to give the students a feel of the end goal. An example is provided in both the Hand Sketching, the Computer Drawings and Design Reporting.
(I reckon this bit is kind of scary for the first day, but the students seem to want more and more of this up front….. A great suggestion coming out of the last PDC was for our students to get their design project diagrams at this point and work with them through out the course….. we’re going to try this in the August PDC.)
Session 3 – Ethics, Limits and Change
Permaculture (as a balcony, courtyard, backyard and farm design and lifestyle integration opportunity) is based on the following ethical basis: (Described at length in “Permaculture, A Practical Guide to a Sustainable Future”; Mollison, B.; 1990, but often simplified)
- “Care of the Earth – Provision for all life systems to continue and multiply.
- Care of People – Provision for people to access those resources necessary to their existence – this is acknowledged as an extension of (1) in that we are a life system
- Setting Limits to Population and Consumption – By governing our own needs, we can set resources aside to further the above principles.” – this is again acknowledged is an extension of (1) and we like to call it “A Fair Share“.
We see these ethics as wrapped up in the immortal words of a great man who documented the need for change and instilled it in us as children well ahead of any mainstream movement. Theodor Seuss Geisel has captured the sentiment of Permaculture for “kids” of any age in the immortal words: (Source: The Lorax, Dr Seuss, 1971)
Session 4 – Principles of Natural Systems and Holmgren’s Principles
Now I’m going to be a very cheaty here as (those hardened readers will know) we have covered this in quite some detail before. Ive included a few diagrams to trigger those old memories from September!

(Quoted everywhere without source, but the likely Original Location)
For those who are new, please have a look back to Permaculture 101 – 1.1 Ethics and Design Principles – An Introduction where we took a fair amount of time to wonder through the back bone of Permaculture and the checklist against which all designs should be assessed.
Session 5 – The Garden Tour
In this session, (note it is just before lunch and just after lunch….. sleepy and dazed students expected at these times so we’re up on our feet getting the blood pumping!) we are talking about the examples of the Principles that can be seen in the garden, reinforcing and making practical the mornings classroom discussion. The purpose of items in the garden are discussed as well as the inter-relationships which will crop up as a topic in the afternoon. Are we working with nature and guiding it or are we trying to work in opposition? The importance of diversity, the balance of pest and predator, each item having lots of purposes, the impact of the seasons and the nutrient movement through the system in soil preparation, plant growth, pruning and compost/mulch.
Lots of Examples can be seen….


Session 6 – Patterns to Details (Broad to Specific)
Whilst I have discussed this in the Permaculture 101 – 1.1 Ethics and Design Principles – An Introduction blog, as this is a significant Principle within this day, I have elected to copy it into here as I could not have said it better myself….
“7. Design from Pattern to Detail – Now we start to get technical…. The ability to recognise spacial (across a space) and temporal (over time) patterns in nature enable us to make sense of what is happening and of converting/capitalising on the pattern within a different context or size of system. “Complex systems that work tend to evolve from simple systems that work, so finding the appropriate pattern for that design is more important than understanding the details of the elements in the system.” This topic is at the core of Permaculture Design and should be a whole blog (if not textbook) in itself. So I will promise to come back to it and do it the justice we deserve, but the exploration of one very important example should at least help us understand where this principle fits within the whole.
Example 1: Forest Patterns – One type of plant grown in the same location year in year out, creates individual mineral deficiencies in the soil, poorer soil life diversity (and every ailment that comes with that!) and ultimately the need for the importation of fertilisers, pesticides and herbicides to correct the imbalance (which nature is trying to do with the weeds and pests!). No natural landscape on earth operates in this manner, but conventional agriculture does just that.
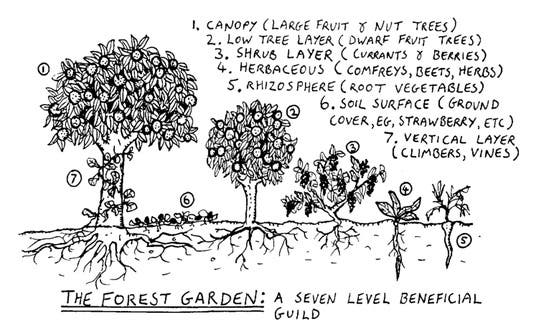
 Nature does not have “weeds” and it does not do “weeding”. Weeds are natures pioneers they are deliberately prolific, opportunistic, vigorous and short life cycled. They are the first plant species to move into a damaged area of soil to ‘fix’ it for more complicated, sensitive plants and eventual succession to forests. Shallow mat rooted weeds are designed perfectly for bare soil stabilization and the shading bare ground. They stop the top soil blowing or washing away, reduce the temperature extremes and allow time for deep rooted weeds and other dynamic accumulators to bring up minerals and trace elements deficient in the top soil (initial germination and growing zone). Once a few generations of weeds have grown, seeded, died, composted and provided habitat for an accumulating little ecosystem, the more advanced but sensitive plants can start to germinate. Various plants then develop to perform various functions (e.g. nitrogen fixing trees) which in combination with each other and the animalia, build up the soils (both in minerals, carbon harvesting (leaf litter, roots), water holding capacity….) to then support even larger trees. The forest ends up with multiple layers (canopy / understory, low tree layer / mid-story, shrub / small shrub / herbaceous / understory, ground covers, root dominant plants, climbing plants and fungi ) all with their respective function. We can draw on this pattern in design, by looking for shade zones already existing for the canopy to protect our sensitive plants or by mulching and planting nitrogen fixers in advance of our fruit trees.
As well as Sun/shade patterns across a garden across the seasons, attention to this patterning of plant purpose and potential structure seems to be up near the top of the list for the DIY Permaculture design tips and tricks.
We’ll come back to this – and have a lot of fun at a later date (plant-nerdy as it might be) – as every design I see created, has these layers defined and their implementation phased through time depending on the starting point. This principle also covers zones, sectors, slopes etc
 (Source – but these diagrams are everywhere.)
Session 7 – Methodology of Design – Elements
Elements are essentially all the bits with in a design and their needs, products and inherent characteristic define how their interaction with one another. Put elements together that can work in a complimentary fashion rather than direct competition and you’ll get a system where the whole is greater than the sum of its parts.
Session 8 – Methodology of Design – Zones
Zones are used to group elements and systems with similar needs for frequency of human interaction into functional areas, or proximity to the home (Zone 0). Human habits and pathways are examined so we can see the areas with existing higher and lower human interaction habitually. Successful design is comfortable, easy and logical if we have to change our habits and pathways too much, things will not get done. To be honest, I find a whole garden design so daunting that I hide behind “zones” to break it down into bite size pieces! By setting different goals for different areas of the garden based on their location (e.g. proximity to kitchen, a habitual path) and hence we can start thinking about placing the right Elements into that Zone.
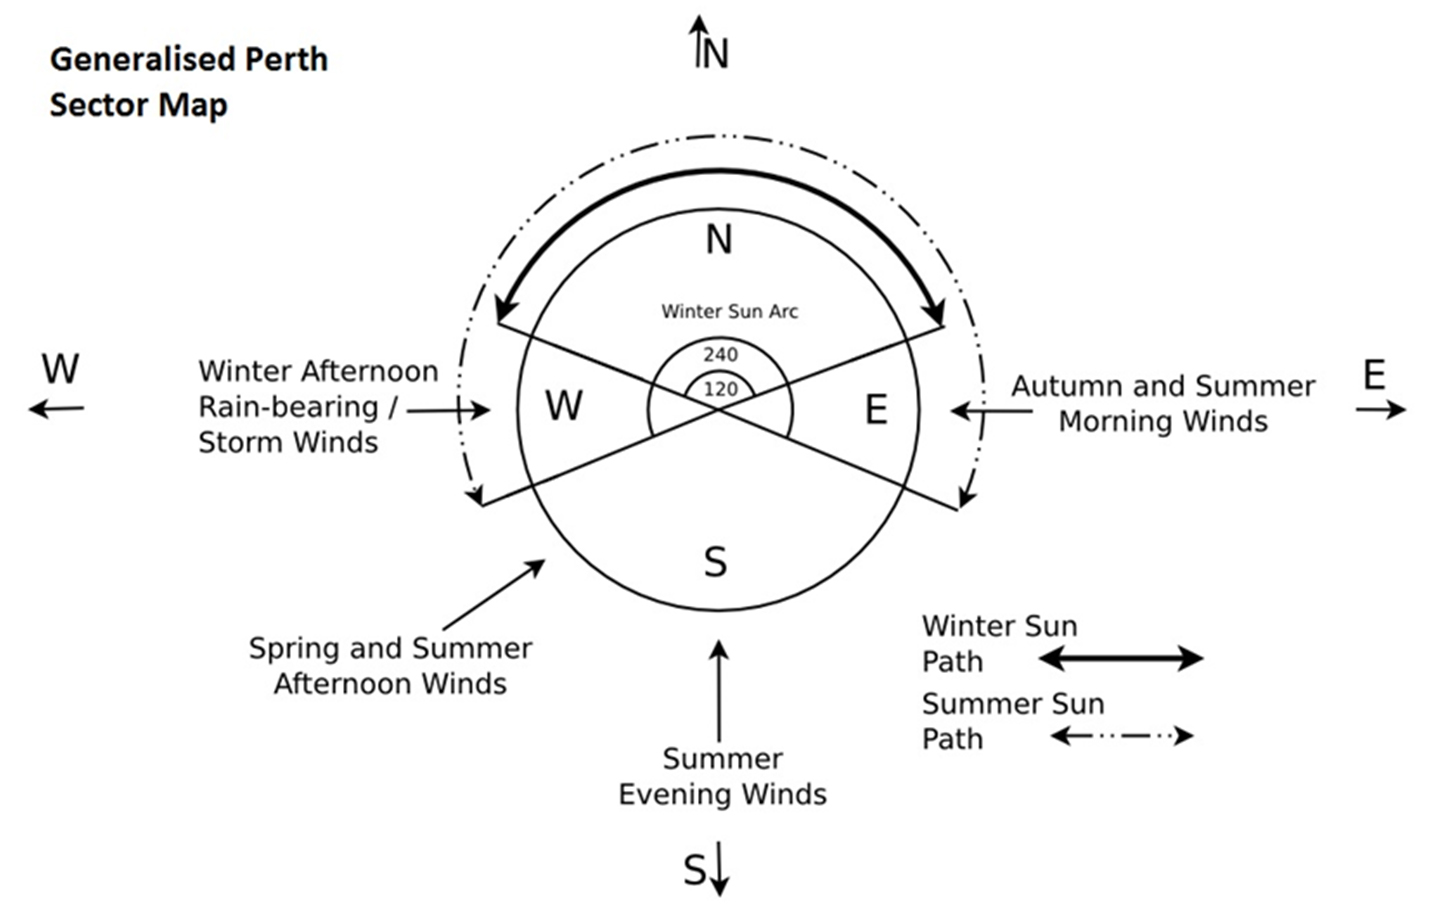
Session 9 – Methodology of Design – Sector Analysis
Looking at what is outside the design but has an impact on it – I.e. the channeling or alternately, protection, from natural energies – wind, sun, fire, water, frost. One of these will often represents a dominant force in a design – e.g. the sun – pretty dominant in Perth!
Session 10 – Methodology of Design – Slope and Orientation (high level)
 For larger properties or those on a severe slope, there is an art to selecting locations for different activities / systems as there are micro climate factors already set up on the simple rule of warm air being less dense than cool air. Clever designs that can capitalise on these characteristics and/or manipulate them through the placement of elements. Additionally with slope, runs water and with water runs nutrients. Another aspect to consider. Rapid flowing run off can be destructive, but techniques to capture, carefully guide or, at the very least, slow water movement can be used to gain benefit from such a landscape. In a rural setting, slope is also a huge consideration for potential fire behaviours.
 Orientation is more critical for the capture of sunlight – in winter to maximise the gardens bulk production period with its free energy source, but in summer to limit the midday and afternoon sun. The orientation of the house and consideration of its solar passive features are just as important in your garden layout as the protection of the garden itself. Cooling Zone 0 (the human living space) is a critical design feature in Perth’s harsh summers.
AND with a short recap at the end of the day focused on what the rest of the course holds, that is Day 1….. By now, we’re all pretty exhausted, a little frightened by the magnitude of the task before us and yet eager to continue to journey. The first day is tough as students are typically a little quiet, the presenters are trying hard to make everyone comfortable with the learning environment and the logistics co-ordinator is in overdrive as she ensures people have what they need and ask for help when necessary. Everyone walks away a little stunned…..but, fear not, tomorrow is a day filled with Soil (our happy place and the first thing we need to grow in a garden!) followed by seed saving, sowing, and propagation. A light hearted, hands-on, interactive day for all.
Well, we survived Terra Perma’s PDC Day One and as a treat for those Soil Lovers who have persisted through a purely Permaculture post…. eminent groups around the world have released videos for the year of the soil. I have chosen one (sorry UN, yours came second!) for us to both ponder and gain inspiration from…. Mr Permaculture / Mr Pemberton / Mr MGee –
Down Down Down (Song for Soil) – Permaculture Day 2015
(And as another treat – I just realised that the difference between Lover and Loser is only one letter and I nearly repelled the entirety of my readership by missing the key I wanted on the keyboard by an inch!)
Until next time, enjoy
SH

An utter delight …. except for the notable omission of the most wonderful morning and afternoon tea breaks that mean you have no desire or need for lunch! 🙂
LikeLike
Thank you, Carole. You are too kind!
LikeLike
Pingback: The Permaculture Design Course – To Do or Not To Do? On the 2nd Day of the PDC…. | The Soil Hugger's Journey
Pingback: The Permaculture Design Course – To Do or Not To Do? On the 3rd Day of the PDC…. | The Soil Hugger's Journey
Pingback: The Permaculture Design Course – To Do or Not To Do? On the 4th Day of the PDC…. | The Soil Hugger's Journey