
Carrying on from our last adventure….. now we know the layout of the property we’re doing the design for, we have an aerial diagram to draw on and we have some initial interpretations of the block from the diagram, the general area’s climate and even the attitude of the council towards elephants. Step 1 completed – CHECK!
Permaculture 102 – Step 2 – The Prior Planning Prevents P Poor Performance (B) (Otherwise known as The 6 P’s ) – Mapping the Natural Energies (or using lingo “Preliminary Sector Analysis”)
(a) What is the aim of this step:
This step gives us the first look at real Permaculture thinking – the Sector Analysis of the space. We’ll look at what is outside the design area but has an impact on it – I.e. the channeling, or alternately protection from, one of nature’s energy sources – wind, sun, fire, water, frost. One of these will often represents a dominant force in a design – e.g. the sun – pretty dominant in Perth!
Whilst this example will be specific to Perth, similar input information will be available for anywhere in the world and the interpretation will be the same. The only difference is that perhaps an alternate energy source will dominate your design.
Please remember from Step 1 – I am talking about arriving at a location, understanding a foreign landscape, and looking at the area around the property – I.e. you are working for a client. But if you’re just doing your own block, then the best advice is to “take off the owner’s hat and put on the designer’s hat” and approach the project in exactly the same way as I describe. Pretend you have not seen it before… put away the desires, sentiments and nice-to-haves (we’ll bring them back in later – the client interview!). It is easier and more effective for the system to design it objectively first and then adjust (with attention to the Permaculture Principles!) later to incorporate the hopes of the “client”, than doing it the other way around. So, put that designer hat on, and take a look at your space with your new Permaculture eye!
(b) What you need to start this step:
- The diagram from Step 1 – either on a computer, printed out, self drawn or what ever works for you.
- Some pencils/pens/textas (or virtual options if you are working on a computer) of different colours.
- A Protractor (or just a general feel for the difference between 0, 35, 82, and 90 degrees from horizontal (ground level),
- A ruler to help you transfer your scale from Step 1 to different areas around the area.
(c) What you’ve got when you finish this step:
This step will give you an idea of the seasonal changes occurring within the block and hence the heat/solar energy, air flow, fire risk, water delivery opportunity/problems, or chill locations that need to be worked with at a very high level. This helps you know (a) what plants will survive and thrive in different areas of the garden all year round and for many years to come (perennials); (b) which spaces should be dedicated to annuals (with alternate season options too!); and (c) where we can look at creating new protection systems to extend the time an area is suitable for growth (E.g. the addition of a deciduous tree or a wind guiding bank of plants).
Those energies less dominant in the urban setting (e.g. fire, water) will be explored in more detail once we have got a handle on the design process by running through it completely once and then having the confidence to look at the differences in approach for rural blocks.
HOW TO GET FROM (b) TO (c):
THE MAIN AIM:
One of key ideas behind a Permaculture Design is that “systems, fueled by the sun, should produce not only their own needs, but the needs of the people creating or controlling (hopefully guiding) them. Thus, they are sustainable….. We can use energy to construct these systems, providing that in their lifetime, they store or conserve more energy than we use to construct or to maintain them.” (Permaculture – A Practical Guide for a Sustainable Future, Bill Mollison)
To achieve this, time needs to be put into planning the system to set it up for success and to ensure that the dependence on our input lessens over time. Recurrent Theme Number 9 – “The philosophy behind Permaculture is one of working with, rather than against, nature; of protracted & thoughtful observation rather than protracted & thoughtless action…“ (Permaculture, A Practical Guide to a Sustainable Future; Mollison, B.; 1990)
This deliberate pre-assessment process (mapping, sector analysis, etc) before speaking to the client onsite is important to enable an objective view of the system. At the client interview onsite, time limitations as well as client desires, previous experiences, or what exists there already can drag us into the details. And here enters Recurrent (AND HARDEST TO STICK TO) Theme Number 8 – Patterns to Details, Patterns to Details, Patterns to Details. (I like the analogy of a jigsaw puzzle – Looking at the patterns is like seeing the overall picture and placing the individual pieces in the general area in which they would go and later adjusting them to fit in with their adjacent pieces. Looking at the details is like choosing one piece and then hunting for its adjacent pieces and working your way out…..The pieces of the puzzle might be called the Elements (all the bits in a design), the pieces combined with their adjacent pieces to make up the characters in the puzzle might be called the Systems (how the elements interact with one another locally) and the overall puzzle is the collation of these systems within the design space giving us the total picture/productive environment). The more you can assess these nature patterns before arriving, the more time you have at the location for noticing (and asking about) the more subtle patterns which will help you place those pieces/elements in the right general areas/systems.
ENERGY NUMBER ONE – THE SUN
The sun is the most important energy to design for in an urban Perth design and this will be our focus for this blog. In short, we have a lot of it and sometimes it is less forgiving than others. The next section is Sun Angles 101 – so if you are pretty comfy with this please whizz down to the summary…. just prior to “ENERGY NUMBER TWO.” However if you’re not, then please spend a bit of time reviewing this (and in some places being told the blindingly obvious – sorry, but I am the lowest common denominator!) because it is going to be evident later why it is so important to have a picture in your mind’s eye of the below diagrams, graphs or another means of remembering the implications of sun and shade. You may only get to see the space in one season, planning for just that season will lead to high work requirements to help it survive. So off we go on Sun Angles 101….
The axis of earth (around which the planet itself rotates – 24hrs) is tilted 23 degrees from the notional vertical (i.e. 23 degrees from the plane which is perpendicular to our elliptical path of orbit round the sun – 365.25days). This tilt does not change. “Because of the axial tilt of the Earth in its orbit, the maximum intensity of sun rays hits the earth 23.4 degrees north of equator at the June Solstice (at the Tropic of Cancer)” – the shortest day in Perth –, “and the maximum intensity of sun rays hits the earth 23.4 degrees south of equator at the December Solstice (at the Tropic of Capricorn)” – the longest day in Perth. The Periapsis noted on the below diagram indicates the time when the earth is at the nearest point to the Sun within its (our) elliptical path and falls anywhere from 2 January to 5 January. (Reference) It is interesting to note the close timing of this Periapsis with the Summer Solstice for Perth and to note for future reference that Perth is 32 degrees south (31..


(Ref)
With that in mind, let’s zoom in on the Summer Time in Perth – December 21st….
 The importance of this will be evident as we move through to the winter intensity diagram. Now, if we change out perspective a little, we can see that the angle the sun hits the earth in Perth is at ~82 degrees to the ground, almost over head.
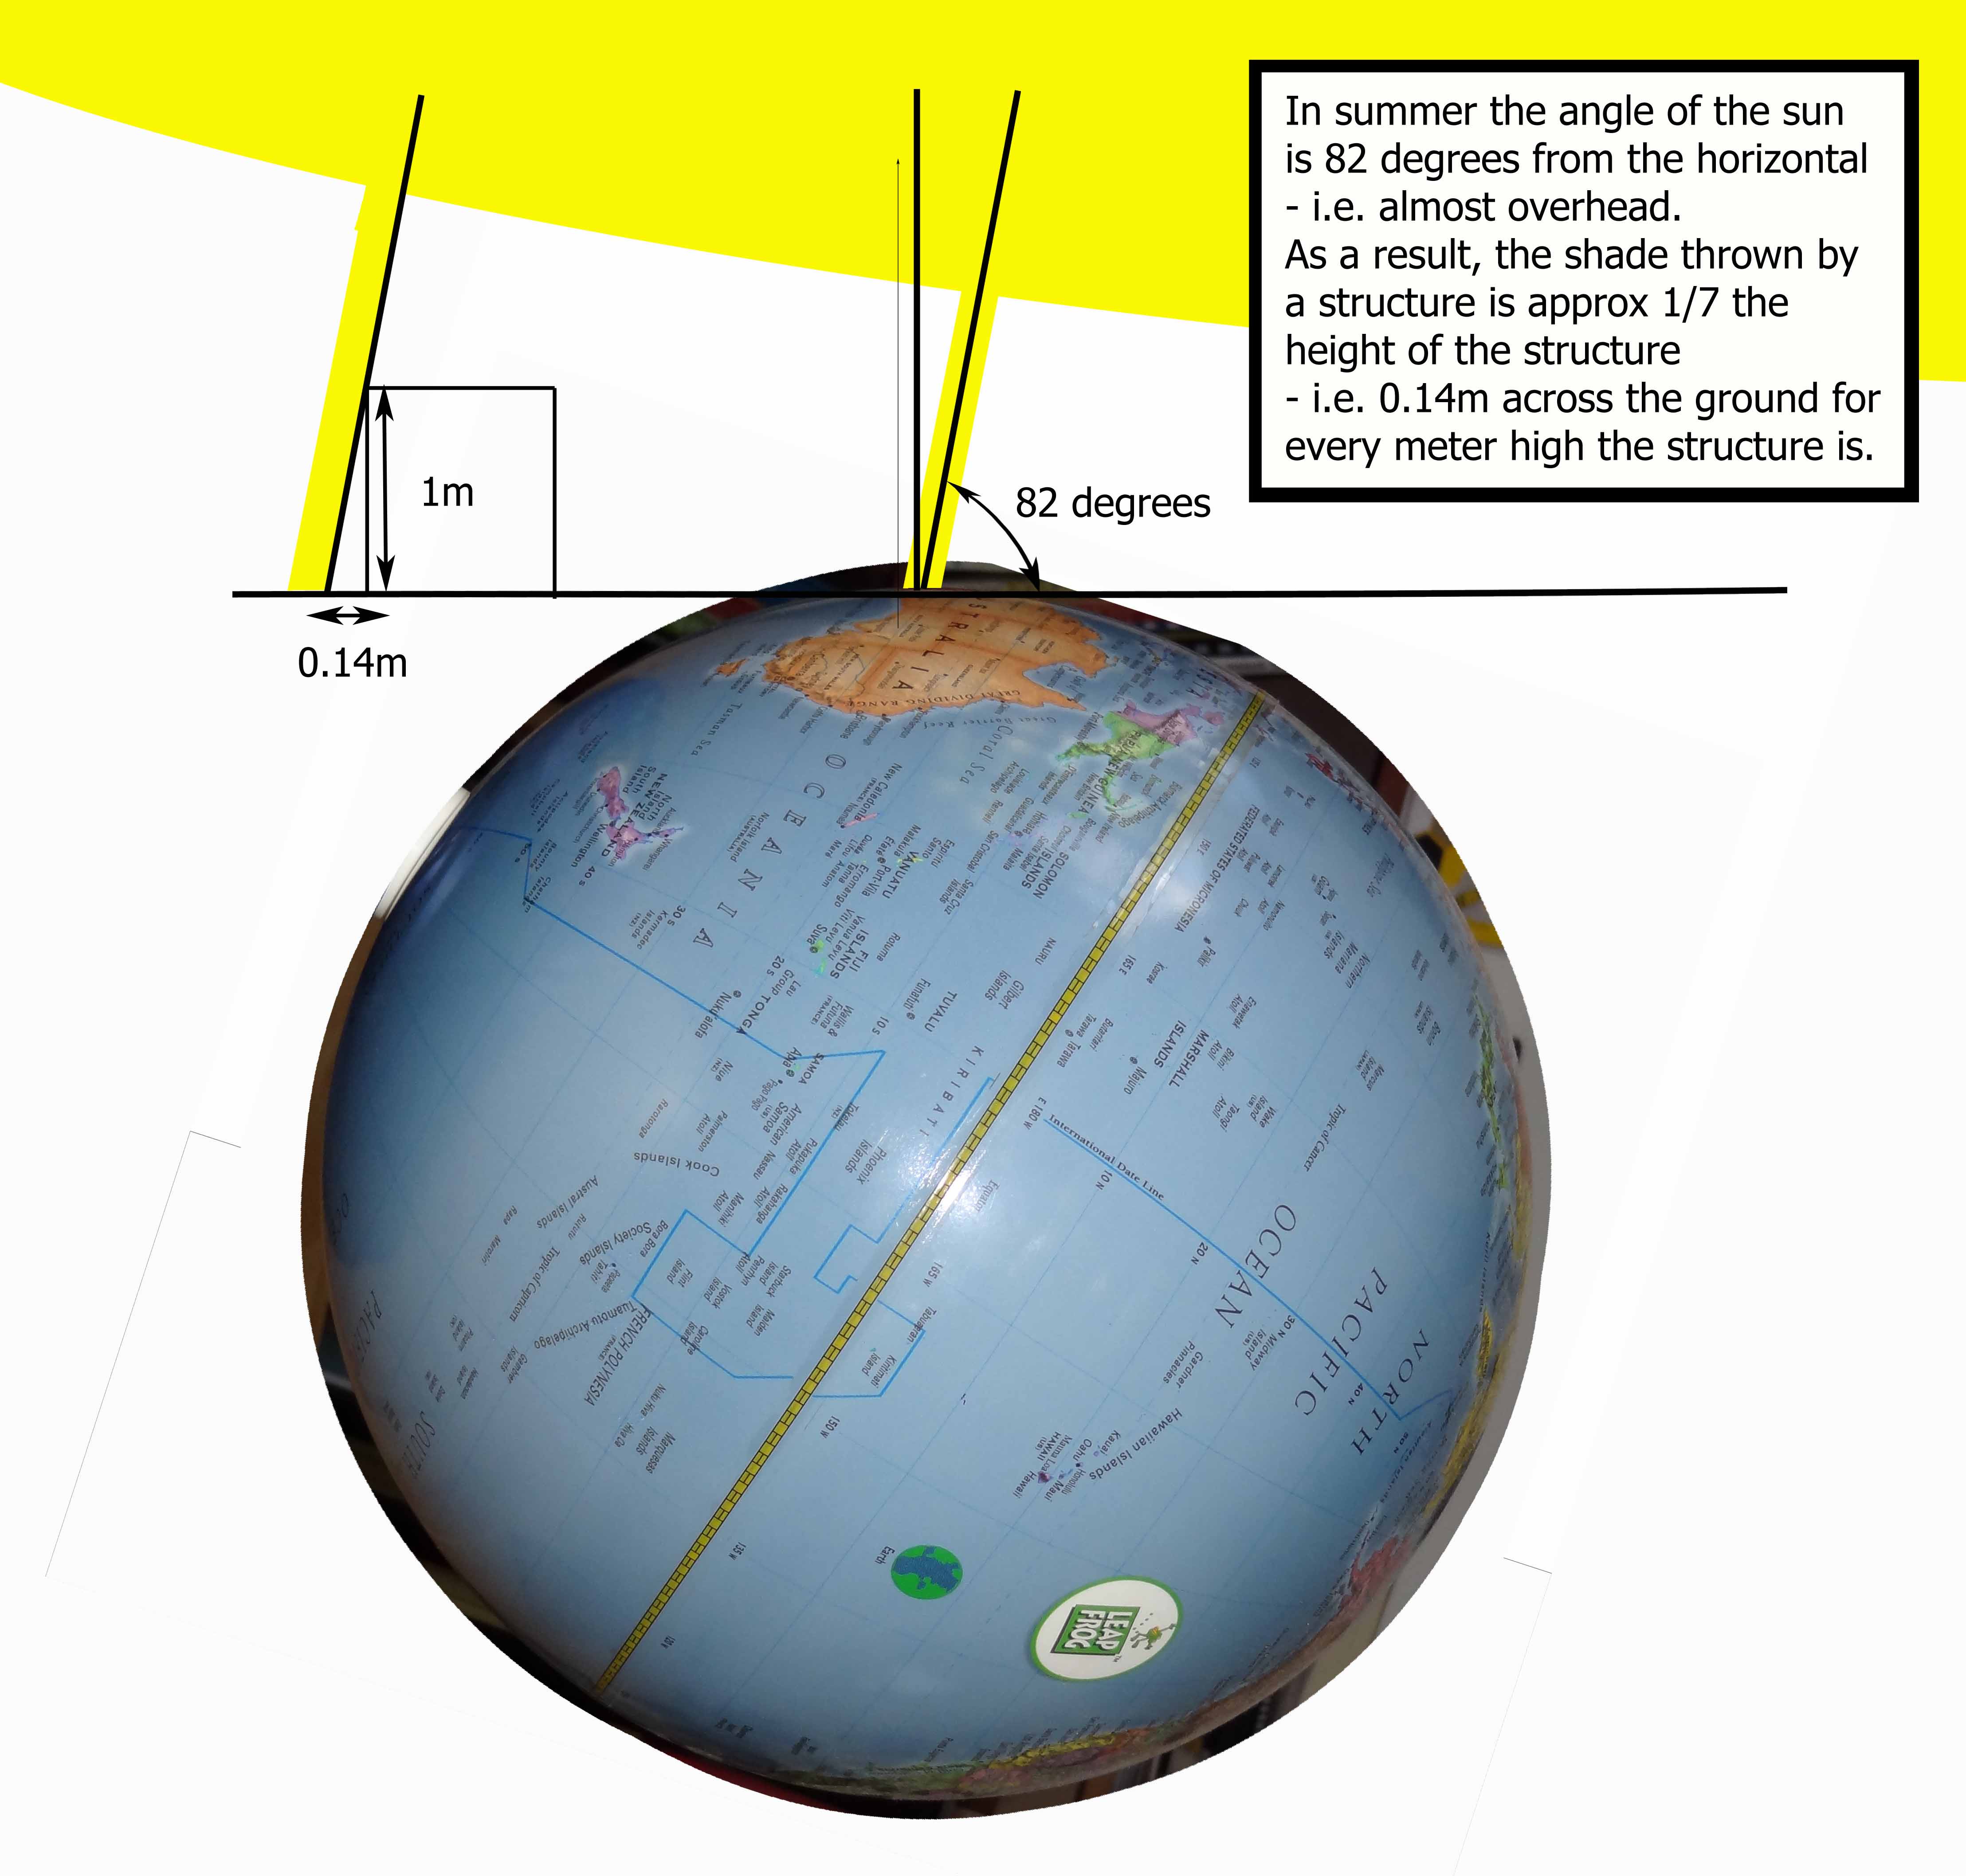 So what we can assume in Perth is that in Summer, on the south side of any structure, the shade provided will be about one seventh of its height.
If we change our perspective again, this time looking down we see the arc of the sun as a high intensity “piece-of-pie”. This piece of pie is called the Sun Arc:
 (Please don’t look too closely – obviously the globe I have used was not “Made in Freemantle”)
I have made the width of the pie reflect the length of the day and the intensity of the yellow reflects the high intensity of the sun’s energy. The height of the pie on the above diagram show the sun shining on Perth from its path over the Tropic of Capricorn. We’ll revisit this when we get to winter to see the difference in schematic representation.
So let’s look at our property and put in the path that the sun is passing – the Sun Arc – plus a little info about shadows – once we get on location we can assess the eaves, roof pitch etc to see what bonus space is available.

The importance of this information is more evident when we turn our attention to the difference apparent in the middle of the year….
 See that the area covered by the unit of sun energy is greater and hence the energy per unit area is less. Additionally with the angle of the sun, the shadows are longer on the south side as per the below


Note here that the width of the pie is narrower reflecting the shorter days and the intensity of the yellow is less showing the intensity of the sun’s energy as less per unit area. The height of the pie on the above diagrams (relative to that in Summer) show the sun shining on Perth from its path over the Tropic of Cancer.
Okay, now we’re going to get a little more complicated… I have kept the pieces of pie narrow to show the middle portion of the day, but what about dawn and dusk? Due to the curvature and tilt of the earth, when the sun rises in Perth, even though it is still above the Tropic of Capricorn (23 degrees south) and “approaching us” over over the Indian Ocean, it appears to rise from the horizon south of us – 28 degrees south of east to be exact in Mid Summer.
You too can steal a child’s globe; use multiple rulers; torches; three sets of arms; and alternate swearing and “eureka”-ing moments…. or you can just believe the internet gurus. Here are a couple of diagrams to try and explain the sun’s path as developed by the internet gurus (who, I’ve discovered are actually right!): (Reference)


So in other words, even though that back wall of the house has been in shadow (red) in both the Summer and Winter Diagram, it may still get the Summer’s early morning and late afternoon light (providing the shadows of other obstacles don’t come into play). Note also that this morning and afternoon light is on a large angle east/west, therefore each unit falls on a large area (as we saw for winter in a north/south direction) and so has a much lower intensity than the noon sun energy unit – i.e. in Summer this is the sunlight to capitalise on or, if we are clever, to create….
So now we have a feel for the shadows on the property across the seasons without having had to spend the “observation” time. We can see that in the Summer the front of the house is exposed, but the back has at least one decent tree to protect some parts. In Winter the back is heavily shadowed, but the front has small trees and will work well as a sunny winter garden. Note that by knowing the date of the intramaps photo and our new knowledge of the sun angles, we can estimate the height of the main structures based on shadow length even before we get there…… The date on the above intramaps was February 2014 – indicating a very large tree on the back west side indeed.
It is important to find the pictorial (or other) method that makes sense to you. The concept of the angle of the sun over the full course of the day and across all seasons has beed represented in the follow Sun Sector Maps. There are many types, so if these don’t gel with you, keep searching.
 (Ref: Murdoch) – Purely sun angles.
But to capture our second major natural energy – WIND – , the following diagram was used in the Terra Perma Design Manual ….
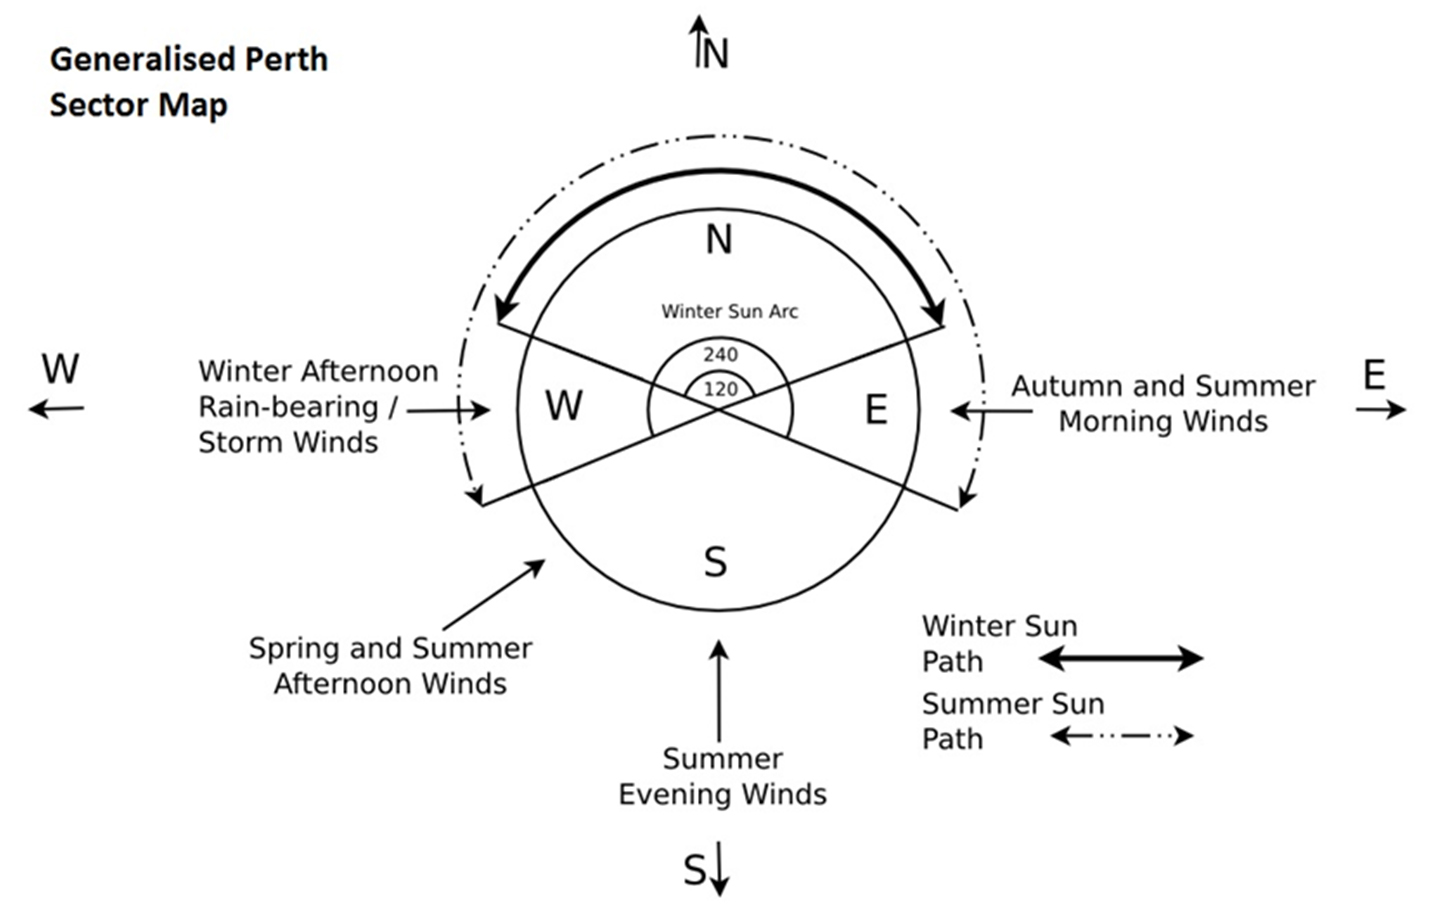 (Ref: Terra Perma Design – PDC Manual)
So without more adieu onto the next energy…
ENERGY NUMBER TWO – THE WIND
Having lived in Perth there are a few breezes which dominate and are general airflows across the city/suburbia –
- Summer and Autumn – early morning easterlies bringing in the heat
- Summer and Autumn – mid (hopefully) to late afternoon south westerly bringing in the cool – the Fremantle Doctor – which then swings southerly in the evening.
- Winter – rains typically coming across the ocean with strong westerlies or north westerlies.
Given the sun is the major energy to plan for in the coastal plain, then the second should be the capture and funneling of the Freo Doctor to cool the garden and living space.
Additionally we might consider pond and lush green vegetation placement on the upstream side of these summer breezes to cool both the garden habitat and the home within it.
In the last blog we looked at the Bureau of Meteorology’s information on wind and rain with would fit well in this step of mapping the energy. Obviously the discussion with the client will let you know about the more local breezes, for example some streets are perfectly set up so that a wind tunnel forms, but its always good to have a feel for the major paths so you know what questions to ask.
ENERGY NUMBER THREE – WATER
On our urban block, we have water “on tap”. Whilst we will always view water as a precious resource, the means by which we capture and use it on our small design block is not going to make or break our design – only our hip pocket and our ethics when it comes to the energy required to deliver this resource to our taps and its scarcity. But we’ll discuss this further later…. covering water catchment measures, ground catchment, bore usage, grey water etc
Alternately in the hills and more rural properties, the key element to look at is water, both for consideration of water catchment and run off / erosion, as with a large property, our means of capture and diversion will make itself evident as a make or break. Once we have covered the urban block design case, we will strike out and examine alternate design scenarios – from balconies to hectares.
ENERGY NUMBER FOUR – FIRE
Again fire is not considered a significant design definer within urban blocks, but when considering the rural block, the summer winds combined with land slopes will quickly highlight the position of fire retarding measures within a design and, again, we will come back to this.
ENERGY NUMBER FIVE – FROST
Not so relevant in Perth, but worth consideration on urban blocks in cooler (more southern or higher altitude) towns/cities and rural blocks when considering planting species or constructing habitats on a slope.
OTHER NATURAL ENERGIES
Many other energy streams might be considered more relevant to the rural block when compared to that of the urban environment. For example: (1) Consideration of wildlife paths and hence fencing choices; (2) Consideration of slope and hence the positioning of the house, chill zones and ponds; (3) Consideration of water catchment locations at higher locations to enable the use of gravity to deliver the water – i.e. fail safe (especially critical in a fire scenario!)…. These will crop up as we consider our urban block, but when the scale increases to the rural setting several more factors guide the placement of the elements within the design. But lets stay simple for our first venture through the process.
And our preliminary Sector Analysis has been completed.
The next steps (and blogs) – Step 3 – Pre-Assessment of the Client – The Client Interview Sheet followed by Step 4 – The Tools of the Trade – Critical Things to Take and finally Step 5 – A QUICK Soil Recap and a Soil Resuscitation (SR) Check List.
Then we’ll be ready to set foot on site, get into more detailed observation and kick off our design process. But don’t be fooled whilst it appears like we are going slow, we must remind ourselves that – Recurrent Theme Number 9 – “The philosophy behind Permaculture is one of working with, rather than against, nature; of protracted & thoughtful observation rather than protracted & thoughtless action…“ (Permaculture, A Practical Guide to a Sustainable Future; Mollison, B.; 1990) Believe me it is this protracted and thoughtful observation that we are going to embrace and you’ll be amazed at the insights we’ll stumble across together.
Until then, enjoy.

Pingback: Permaculture 102 – Permaculture Design Part 3: The Client Interview Sheet. | The Soil Hugger's Journey
Pingback: Permaculture 102 – Permaculture Design Part 3: The Client Interview Sheet – Part 2. | The Soil Hugger's Journey
Pingback: The Permaculture Design Course – To Do or Not To Do? On the 1st Day of the PDC…. | The Soil Hugger's Journey